Azure Active Directory Integration
Overview
We have added support for Azure Active Directory integration with Club Prophet’s POSExpress employee logins. Azure Active Directory (Azure AD) is Microsoft's cloud-based identity and access management service, which helps employees sign in and access resources in external resources, such as Microsoft Office 365, the Azure portal, and thousands of other SaaS applications.
Azure AD makes it easier and faster to onboard new employees, terminate access for leavers, and implement access to new cloud services, so users are up and running more quickly. Single sign-on also encourages compliance with identity and security protocols. So a large company, which may have hundreds of employees, can easily manage that all in one place. If they have several dozen different applications which employees will need access to across the various departments this can make managing these much easier.
Setup
Register AAD Application
-
Login to https://portal.azure.com/#home
-
Click App registrations along the top bar.

-
Click the +New registration button.

-
Enter what you want the name of your application to be.
-
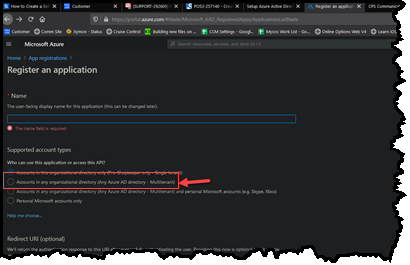
Select the Accounts in any organizational directory (Any Azure AD directory - Multitenant) radio button.
-
Click Register.
Authentication Configuration
-
Click Authentication on the left hand side. The Platform configuration screen displays.

-
Click +Add a platform. The Configure platforms screen displays to the right.
-
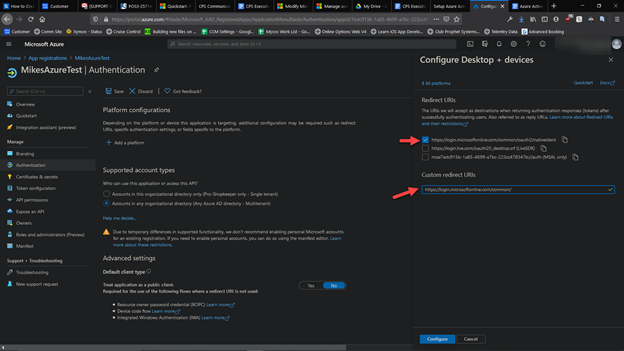
Select Mobile and desktop applications from the right side and at the bottom.
-
Check the first box with https://login.microsoftonline.com/common/oauth2/nativeclient.
-
In the Custom Redirect URIs field, enter https://login.microsoftonline.com/common/
-
Click Configure. A message displays in the top-right corner that this is successful:

Client Secret Key
-
Click Certificates & secrets on the left hand side.
-
Click +New client secret. The Add a client secret dialog box displays.

-
Enter a description and set the expiration day: In 1 year, In 2 years, or Never.
-
Click Add. The new client secret displays with your description and expiration date and a value. You are warned at the top of the screen with this message: Copy the new client secret value. You won't be able to retrieve it after you perform another operation or leave this blade.
-
Copy the generated client secret key value by clicking the Copy button in the lower right corner next to the code.
Tip: Don’t copy or do anything else between this step and the next steps in the next section. For extra safe keeping, paste this code immediately into a safe place on your computer, like Notepad, Word, Google Keep, or any app that stores text.

|
Note: This key will no longer be viewable after logging out of the account. If you did not copy it or somehow lost it you would have to delete it and create a new one. |
Club Prophet’s POS Configuration
-
Open the Club Prophet’s POS Express software and go to Tools | Options | General Options and scroll to the bottom of the page.
-
Click the checkbox Enable Azure Active Directory.
-
Paste the Client Secret Key that was copied in the previous step into the Client Secret box.
-
Go back to the https://portal.azure.com site, and click Overview at the top-left side. Your new application essentials display.
-
Select and copy the Application (client) ID then toggle back and paste that into the POS field of the same name.
-
In the URL field, enter https://login.microsoftonline.com/common/
-
Click Save at the bottom right. Update Completed displays.
Add users
-
Go back to the https://portal.azure.com Note: If you have shut down your home page for this app, log in if need be as adadmin again then select App Registrations. The page displays a search bar with two separate selections, All applications and Owned applications. Click All applications and search the name that you entered in the setup section step 4. The Overview page displays again.
-
In the Overview page, click the name of your app to the right of the Managed application in local director field.

-
Click Assign Users and groups.

-
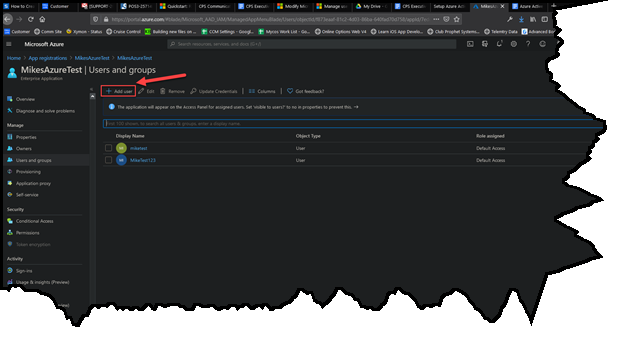
Click +Add User, then click Users - None Selected. The Search window displays to the right of the screen.
-
Enter an existing user account in the Search and press Enter on your keyboard.

-
Select the found account below the search bar then select Select below that to add this user to this application. The Users section updates to the number of users selected.
-
The role will remain as default access and you can click Assign in the bottom left once you have selected your account. The account displays under Display Name in the Users and Groups page.
Note: If you have already created a test account for the Power BI site, you can use the same account.
Note 2: You could assign an entire group as well but in our case, we do not have the subscription level required to do so.
-
If you need to create a new user account, click Home in the top left of the page, and do the following:
-
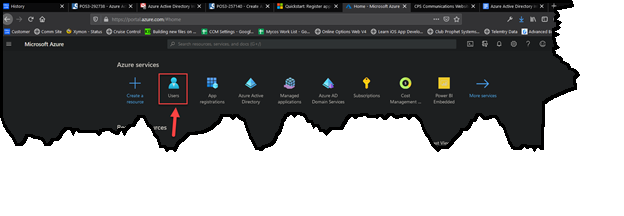
Click Users along the top.
-
-
Click the +New user. The New user page displays.
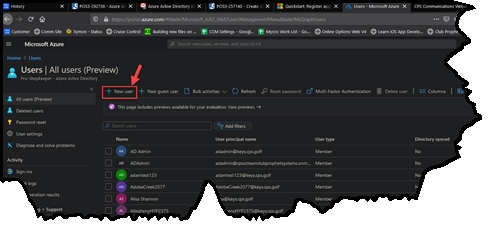
- Enter into the User name field a name for this user.
- Enter the into the Name, First name, and Last name fields the necessary information.
- To create your own password, select the Let me create the password radio button then enter the desired password following the password rules.

-
Click Create from the bottom-left of the screen. The Users page displays again after a few moments.
-
Repeat steps 1-3 to add this user to the application.
-
Once assigned you are ready to log in to the POS using Azure AD.
Logging into POS Express using the Azure AD
You will need to know your Club Prophet employee username and password as well as your Azure AD email and password for the first-time login.
-
Open Club Prophet’s POSExpress. Now that Azure AD is enabled in the POS, you will see the login screen has two different buttons instead of a username and password field.

-
Click Use Azure AD Account. The Microsoft Sign in window displays the first time through.

Note: After you have already signed in with an Azure account on this computer and it is a computer that is shared by employees, you'll see the screen below with all the past emails that have been used.

-
Enter the Azure AD email address and select Next.

-
Enter the password and select Sign in. The Update your password screen displays upon the first login.
-
Enter your current password, then the new password in the New password and Confirm password fields, then click Sign in. The Permissions requested screen displays.

-
Click Accept to accept the permissions requested. The Club Prophet Systems screen displays.
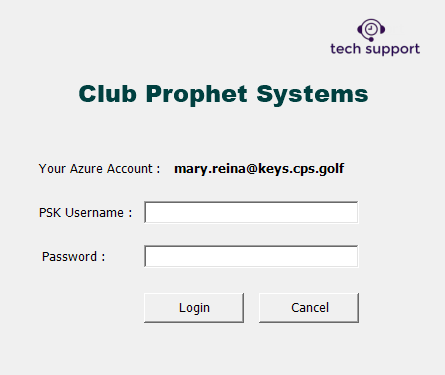
Note: The first time you log in, you will be prompted to link your Azure account with your CP employee user.
-
Enter your PSK Username and Password in the respective fields then click Login.
-
Click Yes if prompted about updating the PSK’s user email to the same email as Azure AD. Otherwise, you will be prompted to link the accounts every time you log in.
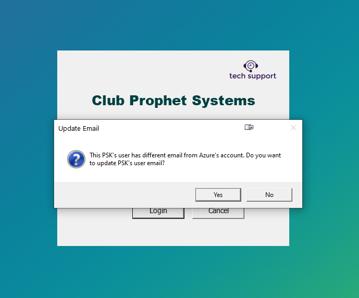
Note: The “proshop” login is a hard-coded login that doesn't show up in the employee set up - avoid linking this username to the Azure AD email because this will link your Azure login to the proshop login and you'd have no way to undo that short of removing the email via SQL manually. Use specific employee accounts already set up in the POS.